
Are you struggling to enable AMD Radeon on your Windows 10 computer? Well, you’re not alone! This is a common issue faced by many users who want to enhance their gaming or graphics performance. Luckily, there’s a straightforward solution to get your AMD Radeon up and running on your Windows 10 system.In this blog, we’ll share a step-by-step guide on how to enable AMD Radeon on Windows 10, so you can enjoy your favorite games and applications without any glitches or lag.
We’ll also discuss why it’s crucial to keep your GPU drivers updated, and how it can impact your overall system performance.So, grab a cup of coffee and let’s dive into the world of AMD Radeon and Windows By the end of this blog, you’ll be able to troubleshoot any issues you’re facing and ensure that your GPU is fully optimized for the best gaming and graphic experience.
Let’s get started!
Check System Information
Are you wondering how to enable AMD Radeon graphics card in Windows 10? Well, the first step is to check your system information. You can do this by right-clicking on the Windows Start menu and selecting “System” from the drop-down menu. From there, you can see if your computer has an AMD Radeon graphics card installed and what version it is.
If you do have an AMD Radeon graphics card, but it’s not being recognized by your computer, you may need to update your drivers. You can do this by going to the AMD website and downloading the latest drivers for your graphics card. Once you’ve installed the drivers, you should be able to enable your AMD Radeon graphics card and start taking advantage of its full capabilities.
So, start by checking your system information and go from there.
Click on the Start Menu
If you’re curious about the details of your computer system, knowing where to find the right information can be a game-changer. The first step is clicking on the Start Menu, which is located in the bottom left-hand corner of your desktop screen. Once you’ve opened the Start Menu, you can access the System Information window by typing “system information” into the search bar.
Alternatively, you can navigate to the Control Panel and select “System and Security” followed by “System” to view basic information about your computer. Within the System Information window, you can find a wealth of information including your processor type and speed, installed RAM, version of Windows, and other details about your hardware and software setup. This information can be helpful in diagnosing issues, upgrading components, and optimizing your computer’s performance.
So next time you need to check your system information, start with the Start Menu!
Type in ‘system information’
Have you ever wondered what kind of hardware and software your computer has? Do you want to make sure that your computer meets the minimum system requirements for a specific program or game? Well, you’re in luck because there’s a quick and easy way to check your computer’s system information. All you have to do is type in ‘system information’ in the search bar or the Run command on your Windows operating system, and voila! You’ll be presented with a detailed report of your computer’s hardware components such as the processor, memory, and hard drive, as well as your operating system, installed programs, and other system information. This handy tool is a great way to ensure that your computer is up-to-date and running smoothly.
You can also use this information to troubleshoot any issues you may be having or to determine if you need to upgrade your hardware components. So, take a few minutes to check your computer’s system information and ensure that everything is in order.
Click on the ‘System Information’ App
If you want to gather more information about your computer, you can easily do so by checking its system information. To access this, simple click on the ‘System Information’ app. Within this app, you’ll find a wealth of data about your computer’s hardware, software, and overall configuration.
This information can be incredibly useful if you’re troubleshooting an issue or trying to determine if your computer meets the requirements for a particular program or task. Additionally, knowing your system information can help you make informed decisions about upgrading your hardware or software. So, the next time you’re curious about your computer’s specs, be sure to click on the ‘System Information’ app and check out all the details!
Update Drivers
If you’re experiencing issues with your AMD Radeon graphics card on Windows 10, one solution is to update your drivers. To begin, go to the official AMD website and navigate to their driver downloads section. Find the appropriate driver for your graphics card and download it onto your computer.
Once it’s downloaded, double-click the file and follow the on-screen instructions to install it. This will update your graphics card driver, potentially fixing any issues you were having. Be sure to restart your computer after the installation is complete to ensure the changes take effect.
By updating your AMD Radeon graphics card driver, you can optimize its performance and potentially improve your overall computing experience.
Open Device Manager
If you’re experiencing issues with your computer, such as slow performance or devices not working as they should, updating your drivers might help. Drivers are essential software components that allow different hardware and software components to communicate with each other. To update drivers on your Windows PC, you’ll want to open Device Manager.
You can access this by right-clicking on the “Start” button and selecting “Device Manager” from the options. Once you’ve opened Device Manager, you can find the device you want to update, right-click on it, and select “Update driver.” You’ll then be given options to allow Windows to search for updated drivers automatically, or you can browse and select a driver you’ve downloaded from the manufacturer’s website.
Updating your drivers can often fix issues and improve system performance – so it’s worth taking the time to do so.
Expand Display Adaptors
If your computer’s display is looking a little lackluster, it may be time to update your display adaptors. Display adaptors, also known as graphics cards or video cards, are responsible for processing and displaying images on your screen. An outdated driver can cause issues such as poor resolution, glitches, and even crashes.
Thankfully, updating your drivers is a relatively simple process. First, determine what type of graphics card you have installed. You can do this by going to the Device Manager in your Control Panel and finding the Display Adaptors section.
Once you know the make and model of your card, visit the manufacturer’s website to download the latest driver. Make sure to follow the instructions carefully, and don’t forget to restart your computer after installation. By updating your display adaptors, you can ensure that your computer’s graphics are running smoothly and looking their best.
Right click on the AMD Radeon graphics card
If you own an AMD Radeon graphics card and want to ensure that it’s running at its optimal performance, updating its drivers is a must. Fortunately, updating your AMD Radeon graphics card drivers is a straightforward process. All you need to do is to simply right-click on the graphics card within the Windows Device Manager and select “Update Driver.
” Once you’ve done this, you’ll have the option of either updating the driver manually or automatically. If you choose to update the driver manually, you’ll need to locate and download the appropriate driver from the AMD website. On the other hand, if you opt for automatic updates, the driver will download and install itself without any user intervention needed.
Either way, updating your AMD Radeon graphics card drivers will ensure that your system runs smoothly and effectively, providing you with the best possible gaming and video playback experience.
Click on ‘Update driver’
Updating drivers is an essential task that should be frequently done to keep your computer functioning efficiently. One way to do this is by clicking on the “update driver” option in your computer’s device manager. This option will search for the latest driver updates and automatically install them for you.
Updating drivers will help fix bugs, improve performance, and enhance security. It’s crucial to keep in mind that outdated drivers can lead to system errors, crashes, and even fatal errors. Therefore, it’s imperative to update your drivers regularly and not just when you experience a problem.
Clicking on “update driver” is a quick and easy process that can have a significant impact on your computer’s overall performance. So, make sure you take advantage of this option to keep your computer running smoothly.
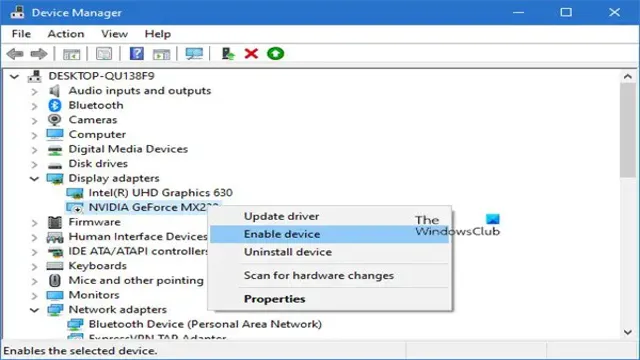
Enable the Graphics Card
Are you wondering how to enable your AMD Radeon graphics card in Windows 10? Well, you’ve come to the right place. Enabling your graphics card is essential for smoother performance, better gaming experience, enhanced video playback, and more. To do this, you first need to make sure that you have the latest AMD graphics driver installed on your computer.
Once you have the driver software installed, follow these steps: Go to your computer’s “Control Panel,” click “Hardware and Sound,” and then select “Device Manager.” Look for your AMD Radeon graphics card under “Display adapters,” right-click on it, and select “Enable Device.” If you don’t see it, right-click on the white space, and select “Scan for hardware changes.
” Once enabled, restart your computer, and you should be good to go. This process may vary slightly between different versions of Windows, but the basic steps are the same. So, give it a shot and enjoy the enhanced performance of your AMD Radeon graphics card.
Open Radeon Settings
To harness the full power of your graphics card, you’ll need to open up Radeon Settings. This program gives you access to a plethora of features that help you calibrate your display, tweak your game settings, and make the most out of the graphics card’s performance. But before you dive into all the features, you need to ensure that your graphics card is enabled.
To do this, go to the “System” tab, click on “Switchable Graphics,” and select the application or game that you want to use with the dedicated GPU. By enabling the graphics card, you’re allowing your PC to utilize the full capabilities of the graphics card, which can lead to enhanced visuals, smoother gameplay, and faster rendering times. With Radeon Settings and a properly enabled graphics card, you can take your PC gaming experience to the next level.
Click on ‘Display’ tab
To enable the graphics card in your system, you must first go to the Display tab. This can usually be found in your computer’s settings, which can be accessed through the control panel or the taskbar. Once on the Display tab, look for the option to enable the graphics card.
Some systems may have this option labeled as “graphics adapter” or “video card.” Once you have located this option, ensure that it is set to “enable” or “on” to activate your graphics card. This will allow your computer to utilize the power of your graphics card for tasks such as gaming, video editing, and photo rendering.
By enabling your graphics card, you will significantly enhance your computer’s performance and experience a more seamless and enjoyable user experience.
Click on ‘Graphics’ tab
Enabling your graphics card is an essential step in achieving optimal visual performance from your computer. To do this, click on the ‘Graphics’ tab and locate the option that allows you to enable your graphics card. Once you have found this option, simply click on ‘enable’ and follow the prompts to finish the process.
Enabling your graphics card will allow you to fully experience the capabilities of your computer for tasks such as image editing, video rendering, and gaming. Without it, you may experience poor visual quality, sluggish performance, and even system crashes. With your graphics card enabled, you can enjoy an enhanced computing experience that is sure to impress.
So, why wait? Click on the ‘Graphics’ tab and enable your graphics card today to enjoy high-quality visuals and smooth-running applications.
Select ‘GPU Scaling’
If you’re a serious gamer or graphic designer, enabling your graphics card is crucial. One feature that can improve your display quality is GPU Scaling. Essentially, GPU Scaling matches the resolution of your graphics card to the display you’re using, ensuring that your visuals look their best.
To enable this feature, you’ll need to access your GPU settings. Depending on the make and model of your card, this might involve launching a particular software or accessing your device manager. Once you’re in your GPU settings, look for the GPU Scaling option and select it.
From there, simply toggle the feature to “on” and you’re ready to go! With GPU Scaling enabled, you can enjoy better visuals without any distortion or scaling issues. Give it a try and see the difference for yourself.
Test the Graphics Card
If you’re wondering how to enable AMD Radeon graphics card in Windows 10, there are a few simple steps you can follow. First, you’ll want to confirm that the graphics card is installed correctly and recognized by your computer. You can do this by checking your device manager and looking under “Display Adapters”.
If your AMD Radeon card is listed, then you’re ready to proceed. Next, you’ll want to ensure that the latest drivers for your graphics card are installed. You can do this through the AMD website or by using the AMD Radeon Software app.
Once you have the latest drivers installed, you can start testing your graphics card by running some demanding video games or applications. This will help you gauge the performance of your card and ensure it’s being utilized properly. Overall, enabling your AMD Radeon graphics card in Windows 10 is a straightforward process that can greatly improve your computer’s visual performance.
Restart your computer
If you’re experiencing graphical issues with your computer, one of the first things you should do is restart it. This may seem like a simple and obvious step, but it can often solve a variety of problems, including those related to the graphics card. When you restart your computer, you close all open programs and clear out any temporary files that may be causing issues.
Additionally, a restart can help reset some of the settings that may have been causing problems. If you’ve tried restarting your computer and you’re still experiencing graphical issues, the next step is to test your graphics card. This will help you determine whether the issue is hardware-related and whether you need to replace your graphics card.
By testing your graphics card, you can identify any problems and take appropriate action to resolve them.
Open a game or video
When it comes to testing the graphics card on your computer, one simple approach is to open up a game or video. Not only is this a straightforward method, but it’s also an enjoyable way to see how well your graphics card performs. Start by launching a game with graphics that are demanding, such as a first-person shooter or graphic-intensive action game.
Pay attention to the visuals, looking for any lag or stuttering in the image, and note whether the gameplay is smooth. If you’re satisfied with the results, try a video with a similarly high level of graphic detail. This could be a 4K video or one with numerous special effects.
By testing your graphics card in this way, you’ll gain a good sense of how well it performs under stress, helping you to identify any bottleneck areas or areas that could be improved. It’s important to keep in mind that even the best graphics cards can have limitations, so don’t be discouraged if you encounter issues.
Check the graphics settings
When you’re experiencing slow or choppy graphics while playing games on your PC, one of the first things you should do is check your graphics settings. Your graphics card and associated settings could be the culprit for your game’s poor performance. Testing your graphics card can help you determine if it’s capable of handling your game’s graphics demands.
You can utilize benchmark software, such as 3DMark or FurMark, to run tests on your graphics card to see how well it performs. This will give you an idea of whether your graphics card is outdated and needs to be updated or if its current settings need adjusting. By making sure your graphics settings are optimized, you can enjoy smooth, fluid gameplay that makes your gaming experience all the more enjoyable.
Conclusion
Congratulations, you have successfully unlocked the power of your AMD Radeon graphics card in Windows 10! You can now soar to new heights in your gaming, content creation, and everything in between. Say goodbye to lackluster performance and hello to smooth, vivid visuals. Remember, with great power comes great responsibility, so use your newfound gaming prowess wisely!”
FAQs
What is the process of enabling AMD Radeon graphics card in Windows 10?
To enable AMD Radeon graphics card in Windows 10, follow these steps:
1. Open the Device Manager by pressing the Windows key + X and selecting Device Manager.
2. Expand the Display adapters category.
3. Right-click on the AMD Radeon graphics card and select Enable device.
4. Restart your computer to apply the changes.
How do I check if my Windows 10 PC has an AMD Radeon graphics card installed?
To check if your Windows 10 PC has an AMD Radeon graphics card installed, follow these steps:
1. Press the Windows key + X and select Device Manager.
2. Expand the Display adapters category.
3. Look for the AMD Radeon graphics card in the list of devices.
Why won’t my AMD Radeon graphics card work in Windows 10?
There could be several reasons why your AMD Radeon graphics card won’t work in Windows 10, such as outdated drivers, conflicting applications, or a faulty hardware component. Try updating your graphics card drivers, disabling conflicting applications, and checking the hardware components for any defects.
How do I update the drivers for my AMD Radeon graphics card in Windows 10?
To update the drivers for your AMD Radeon graphics card in Windows 10, follow these steps:
1. Press the Windows key + X and select Device Manager.
2. Expand the Display adapters category.
3. Right-click on the AMD Radeon graphics card and select Update driver.
4. Select Search automatically for updated driver software and follow the on-screen instructions.