
If you’re the lucky owner of the new DJI Mini 3 drone, you’re probably eager to get out there and start capturing some stunning aerial footage! One of the first things you’ll need to do is insert an SD card into your drone to store all those fabulous images and videos. But if you’re a newbie to the world of drones, or even just to this particular model, you may be wondering exactly how to go about doing that. Fear not, because in this post we’ll show you just how easy it is to insert an SD card into your DJI Mini
Whether you’re a pro or a novice, you’ll be up and flying in no time. So sit back, relax, and let’s get started!
Locating SD Card Slot
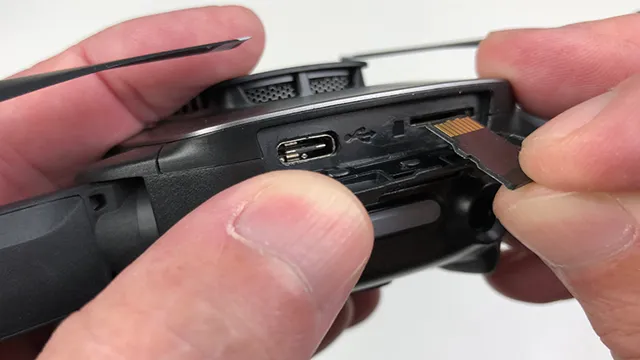
If you’re wondering where to insert the SD card on your DJI Mini 3, don’t worry, we’ve got you covered. The SD card slot on the DJI Mini 3 can be found on the left-hand side of the drone’s body. It’s a small slot that is located just above the USB-C port.
Simply insert the SD card into the slot, making sure that it clicks into place. You’ll hear a faint click once the card is securely in place. Don’t forget that the SD card is an essential component of your drone, allowing you to save and store all of your captured footage.
So, make sure to insert the card correctly to avoid any damage or loss of data. With the SD card in place, you can take your DJI Mini 3 on all sorts of adventures and capture incredible footage to share with your friends and family.
Finding the Access Panel
If you’re looking to use an SD card with your device, the first step is locating the access panel. Typically, the access panel is located on the side or bottom of the device. If you’re unsure, check the user manual for the exact location.
Once you’ve located the access panel, it’s time to find the SD card slot. The SD card slot is usually located inside the access panel, so you’ll need to remove the panel to gain access to it. In some cases, the SD card slot may be located on the side of your device, so be sure to check both locations before giving up.
Keep in mind that not all devices have SD card slots, so double-check your device specifications before purchasing an SD card. With a bit of patience and a keen eye, you’ll be able to locate the SD card slot quickly and easily.
Identifying the SD Card Slot
When it comes to locating the SD card slot on your device, it can be a bit confusing at times. Depending on the model and make, the SD card slot could be located in different places. For instance, some devices have the slot on the side, while others could be located under the battery cover.
You could also find it on the back of the device, on the bottom, or even on the top. To identify the SD card slot, you may need to look for an image or symbol of an SD card on the device, which could be present on the housing or within the settings. Another option is to check the user manual, which should indicate the location of the SD card slot.
Notably, if you still can’t find the slot, you could consider reaching out to the manufacturer or looking for online support to guide you. Remember to keep the device powered off before inserting or removing the SD card.
Preparing the SD Card
If you’ve recently purchased a DJI Mini 3, it’s important to make sure you have an SD card properly inserted before taking off on your first flight. The SD card slot can be found on the side of the drone and it’s important to use a high-quality Class 10 or UHS-1 microSD card for optimal performance. When inserting the card, make sure the gold contacts are facing upwards and gently push it into place until it clicks.
It’s important to format the SD card before using it for the first time, as this will ensure it’s optimized for use with your DJI Mini To do this, simply insert the card into your computer and format it to FAT32 or exFAT file systems. Your DJI Mini 3 is now ready to capture stunning aerial footage and you can rest assured that your SD card is properly prepared for recording and storing all of your footage.
Formatting the SD Card
When it comes to using an SD card, it is important to first prepare it before use by formatting it. The process of formatting will erase any previous data on the card and create a new file system that is compatible with your device. To do this, you will need to insert the SD card into your device and navigate to the settings or storage section.
From there, you can choose to format the SD card by selecting the option to “erase” or “format” the card. Once this process is complete, your SD card will be ready to use and you can begin transferring files or using it to save data. However, it’s important to note that formatting your SD card will permanently delete all of the content on it, so be sure to backup any important files before proceeding with the formatting process.
By following these simple steps, you can ensure that your SD card is properly formatted and ready for use in your device.
Choosing the Right Size SD Card
When preparing an SD card, it’s important to start with the right size for your needs. Choosing an SD card that’s too small might limit your storage capacity and prevent you from capturing all the photos and videos you want. On the other hand, opting for an SD card that’s too large might be overkill for your needs and result in paying extra for unused space.
It’s a balancing act that requires some consideration of your recording habits and editing needs. A good rule of thumb is to choose an SD card that offers slightly more storage than what you currently expect to use. This allows some wiggle room for larger-than-expected files or for capturing additional footage on a particularly long shoot.
Once you have selected the right size, preparing the SD card is simple. Insert it into your device and connect it to your computer, then format the card according to your device’s instructions. With your SD card ready to go, you can enjoy worry-free recording and editing.
Inserting the SD Card into an Adapter
Inserting an SD card into an adapter is straightforward and easy to do. Before inserting the card, make sure it is clean and free from debris or fingerprints. Then, carefully insert the card into the adapter, making sure to line up the small notches on the card with the corresponding notches on the adapter.
Once the card is in place, slide it into the appropriate slot on your computer or device. If you encounter any resistance, double-check that the card is lined up correctly and try again. It’s important to remember to handle the card and adapter with care to avoid damage or corruption of your data.
By taking a few simple precautions, you can safely and easily prepare your SD card for use.
Inserting the SD Card
Inserting an SD card is a crucial process for your DJI Mini When it comes to inserting the SD card, you need to ensure that you have switched off the drone before proceeding. The DJI Mini 3 SD card slot is situated on the side of the drone, just beneath its battery compartment.
You have to pull out the tab beneath which you will see the SD card slot. You can now insert your SD card into the slot carefully, ensuring that you have inserted it the right way up. Make sure to push the SD card in all the way until it clicks into place.
This will ensure that it is secure and won’t get ejected when the drone is in use. You can then push the tab back in, and close the battery compartment. You are now ready to use your DJI Mini 3 drone with the SD card inserted.
Remember not to remove the SD card while the drone is in operation as this can cause damage to your files. With these easy steps, you’re all set to capture stunning videos and photos with your DJI Mini 3 drone.
Gently Pushing the SD Card into the Slot
Inserting an SD card into your device can seem like a daunting task at first, but with a few simple steps, the process can be as easy as pie. The first step involves finding the SD card slot, which is usually located on the side of your device or on its back. Once you’ve located the slot, it’s time to gently push the card into it.
Make sure you’re inserting the card in the correct orientation – with the metal contacts facing downwards. You’ll know the card is properly inserted when you hear a soft click that indicates it’s securely in place. If the card doesn’t seem to fit, don’t force it in, as this can cause damage to both the card and the device.
Instead, try removing the card and checking the orientation again, as it’s easy to accidentally insert the card upside down or backwards. With these simple steps in mind, you’ll be able to insert your SD card like a pro in no time. Happy snapping!
Verifying Successful Insertion
Inserting an SD card into a device may seem like a simple task, but it’s important to ensure it’s done correctly. Before inserting an SD card, make sure the device is turned off to prevent any damage. Once the device is off, look for the SD card slot, which is typically located on the side or back of the device.
Gently insert the SD card into the slot with the contacts facing down, making sure it’s fully seated. Once the card is inserted, turn the device on and check to see if it’s been recognized. If the device doesn’t recognize the card, try removing and re-inserting it.
If it still doesn’t work, try using a different SD card or checking the device’s manual for more information. With proper insertion, your device should recognize the SD card and you can begin using it to store your files and data.
Formatting the SD Card in DJI Mini 3
When using the DJI Mini 3 drone, it is essential to install and format an SD card before capturing footage or photos. To insert an SD card into DJI Mini 3, locate the slot on the side of the drone and gently push in the screen to reveal it. Once in place, the card will automatically format the first time the drone starts up, but for subsequent formatting, you can use either the DJI Fly app or do it manually.
To format the card manually, first go to the settings menu on the drone and select the ‘Camera’ option, followed by ‘Format SD card.’ It’s essential to keep in mind that formatting will erase all data on the card, so it’s crucial to transfer any necessary content beforehand. A properly formatted SD card ensures smooth functioning and organization of footage and images, helping you to operate the DJI Mini 3 with ease.
Conclusion
In summary, inserting an SD card into the DJI Mini 3 is like giving a brain to a drone. It allows the Mini 3 to store and access more data, just like a brain stores and processes information. Without an SD card, the Mini 3 may be limited in its capabilities.
So, don’t let your Mini 3 go brain-dead – insert that SD card and let it soar to new heights!”
FAQs
How do I insert an SD card into my DJI Mini 3 drone?
To insert an SD card into your DJI Mini 3, open the battery compartment on the bottom of the drone and locate the SD card slot. Gently push the SD card into the slot until it clicks into place.
What types of SD cards are compatible with the DJI Mini 3?
The DJI Mini 3 is compatible with Micro SD cards up to 256 GB. It is recommended to use a Class 10 or UHS-I rating SD card for optimal performance.
How do I check if my DJI Mini 3 is reading my SD card?
To check if your DJI Mini 3 is reading your SD card, navigate to the camera settings in the DJI Fly app and select “SD card details”. Here, you will be able to see if your SD card is recognized and the current available storage space.
Can I remove the SD card while my DJI Mini 3 drone is turned on?
It is not recommended to remove the SD card while your DJI Mini 3 is turned on as it may cause damage or data loss. It is always advisable to turn off the drone before removing or inserting an SD card.