
Are you ready to take your DJI Mini 3 Pro controller to the next level? One of the essential elements of flying a DJI Mini 3 Pro drone is having a fully charged remote controller. Without sufficient power, it’s impossible to fly your drone to its full potential. However, many beginners can struggle with charging their remote controller for the first time.
Don’t worry; we’ve got you covered. In this guide, we’ll be discussing how to charge your DJI Mini 3 Pro controller, ensuring that you get the most out of your flying experience. So, buckle up and let’s dive in!
Overview
If you are wondering how to charge your DJI Mini 3 Pro controller, you have come to the right place. The process is quick and easy, and it doesn’t require any special skills. You will need to use the USB-C cable that comes with the controller and connect it to a power source.
You can use a wall adapter or a computer USB port, but make sure the power output is at least 5V and 2A. The charging port is located on the bottom of the controller, and you’ll see a small LED light indicating the charge status. Once the controller is fully charged, the LED light will turn solid green.
It’s essential to keep your controller charged to ensure you have the best flying experience. When you take care of your equipment, it will take care of you.
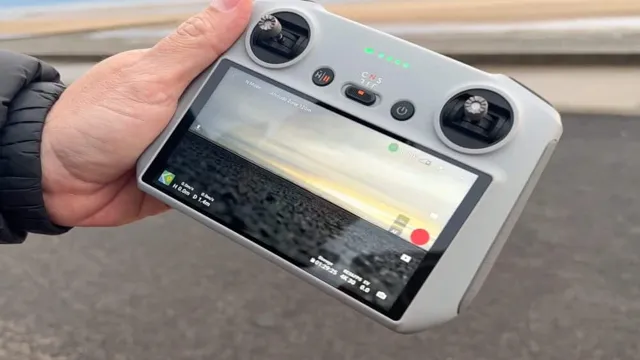
Introduction to DJI Mini 3 Pro Controller
The DJI Mini 3 Pro Controller is the latest addition to the DJI drone controller family. It offers a sleek and compact design while providing a range of advanced features that make flying your drone a breeze. The controller comes with an upgraded OcuSync
0 transmission system, providing you with a reliable and stable connection even when flying at extended ranges. The DJI Mini 3 Pro Controller also features a high-quality display screen that offers detailed and real-time telemetry data, allowing you to make informed decisions during flight. Additionally, this controller comes equipped with customizable buttons, which allow you to personalize the controller’s layout to your specific needs, ensuring that you have quick and easy access to all the features you need during your flight.
Overall, this latest addition to the DJI drone controller lineup is a significant upgrade, providing an incredible flying experience for beginner and experienced drone pilots alike.
Need to Charge Your Controller? Here’s How!
If you’re an avid gamer, you know the frustration of having a dead controller. Nothing is worse than getting ready to play your favorite game, only to realize that your battery is out of juice. Thankfully, there are several ways to charge your controller.
The most obvious way is to plug it into your gaming console using the USB cable that comes with the controller. However, if you don’t want to be tethered to your console while you charge, you can also use a charging dock or a portable battery pack. These options allow you to charge your controller wirelessly, giving you the freedom to move around while you wait for it to charge.
No matter which method you choose, the key is to make sure your controller is always charged and ready to go. Don’t let a dead battery ruin your gaming experience!
Step-by-Step Guide
Charging your DJI Mini 3 Pro controller is an essential task that ensures uninterrupted use of your drone. The controller generally comes with a battery that lasts for an extended period. However, getting to know how to charge it is imperative.
Connect the USB-C cable that comes with your controller to the charging port located at the bottom of the device. You can then plug the other end into a power source or USB adapter. A red light located at the side of the port indicates that it’s charging, and it goes off once it’s fully charged.
It’s advisable to charge the controller fully before the flight to ensure it stays powered for the entire session. Always ensure to confirm the battery power level before taking off to avoid any inconvenience while using the drone. Remember, a well-charged controller significantly improves your flying experience with the DJI Mini 3 Pro.
Step 1: Getting the Charging Cable
When it comes to charging your device, the first step is getting the right charging cable. This may seem straightforward, but there are a few things to consider before choosing one. First, check the type of port your device has.
Nowadays, the most common ports are USB-C and Lightning, but there are still older devices that use Micro-USB or mini-USB. Once you determine the type of port, make sure the cable is the right length for your needs. Shorter cables may be easier to carry around but may not reach outlets in certain locations.
Similarly, longer cables may be more versatile but may be unwieldy to use in tighter spaces. It’s also essential to choose a high-quality cable to prevent damage to your device or possible safety hazards. Don’t be fooled by cheap knockoff cables that may cause more harm than good.
By taking these factors into account, you can find the perfect charging cable that will keep your device juiced up and ready to go.
Step 2: Connecting the Charging Cable
When it comes to charging your device, connecting the charging cable is an essential step. First and foremost, it’s important to ensure that you have the correct cable that fits your device’s charging port. Once you have the right cable, plug one end into the port on your device and the other end into a power source.
Depending on your device, this could be a wall adapter or a USB port on your computer. Make sure that the cable is securely plugged into both your device and the power source, and then wait for your device to start charging. It’s crucial to monitor your device while it’s charging and ensure that it doesn’t overheat.
Once your device is fully charged, disconnect the cable to prevent it from overcharging and potentially damaging your device. By following these simple steps, you can safely and efficiently charge your device without any issues.
Step 3: Plugging In the Cable
Now that you have your modem and router in place, it’s time to connect the cable. First, locate the ethernet port on your modem. It’s usually labeled “Ethernet” or “WAN.
” Once you’ve located it, grab your ethernet cable and plug one end into the port on your modem. Look for the corresponding port on your router, which is usually labeled “Internet” or “WAN.” Plug the other end of the ethernet cable into this port.
You should hear a click when the cable is securely connected. If you’re unsure if the connection is secure, gently tug on the cable to make sure it doesn’t easily detach. Congratulations, you’ve successfully plugged in the cable! The next step is to turn on your modem and router and test the connection to ensure it’s working properly.
Charging Tips and Tricks
When it comes to charging your DJI Mini 3 Pro controller, there are a few tips and tricks to keep in mind to ensure you get the most out of your battery. To start, make sure you are using the correct charger to avoid overcharging or damaging your controller. It is also recommended to charge your controller before each use to ensure you have enough battery life for your drone flight.
Another tip is to avoid leaving your controller in extreme temperatures, as this can shorten the lifespan of your battery. If you need to charge your controller on the go, consider investing in a portable power bank for convenience. By following these simple tips, you can ensure that your DJI Mini 3 Pro controller is always ready to fly when you are.
How to Tell When Your Controller is Fully Charged
One of the joys of owning a gaming console is having the freedom to play whenever you want. But to experience uninterrupted gameplay, you need a fully charged controller. While most controllers come with a charging cable, it can be hard to tell when your controller is fully charged.
A simple way to determine this is by checking the color of the light on your controller. If your controller has a red light, it needs to be charged, but if it has a green light, it’s ready to go. Some controllers also have a blinking light when they’re charging, and a steady light when they’re fully charged.
It’s always a good idea to keep an eye on your controller as it’s charging, so you know when to unplug it. Overcharging your controller can damage the battery and shorten its life span. So, make sure to unplug it as soon as it’s fully charged.
By following these simple charging tips and tricks, you’ll always be ready to game at a moment’s notice.
How to Charge the Controller Faster
If you are a gamer, you know the frustration of having to wait for your controller to charge before you can play again. However, there are ways to charge your controller faster. One trick is to use a wall charger instead of a USB port on your computer.
This is because wall chargers provide more power, which means less time waiting for your controller to charge. Another tip is to turn off your controller while it charges. This will allow it to charge faster without using up any power.
And finally, make sure you are using a high-quality charging cable. A frayed or damaged cable can slow down the charging process, so invest in a good one to save yourself time and hassle. By following these tips, you can get back to gaming in no time without having to wait forever for your controller to charge.
Conclusion
Charging a DJI Mini 3 Pro controller may seem like a mundane task, but it’s a crucial one if you want to keep your drone flying comfortably in the sky. With a little bit of electricity and a lot of patience, you can ensure that your controller is always ready for takeoff. So keep those cords handy, stay charged up, and let your creativity soar – the sky’s the limit!”
FAQs
How do I charge my DJI Mini 3 Pro controller?
You can charge your DJI Mini 3 Pro controller using a USB-C cable and a power source such as a computer or wall adapter.
Can I charge my DJI Mini 3 Pro controller while flying my drone?
No, it is not recommended to charge your controller while flying your drone as it may cause interference and connectivity issues.
How long does it take to fully charge my DJI Mini 3 Pro controller?
It takes approximately 2 hours to fully charge your DJI Mini 3 Pro controller using a power source with an output of 5V/2A.
Can I use a different charging cable to charge my DJI Mini 3 Pro controller?
It is recommended to use the USB-C cable that came with your DJI Mini 3 Pro controller for optimal performance and safety. However, you can use a certified third-party USB-C cable that meets the requirements of your controller.