

Choosing the right cycling setup for your child can transform their outdoor playtime into a lifetime of healthy habits and joyful memories. The best bike for kids isn’t just about size—it’s about safety, durability, and how well it grows with your little rider. Whether you’re looking for their first pedal bike, a creative indoor alternative, or essential accessories to enhance the experience, this guide covers the top picks to make cycling safe, fun, and unforgettable.
From balance bikes to trailers and must-have add-ons, we’ve curated options that prioritize quality, ease of use, and the little details that matter most to parents and kids alike. Let’s explore the best ways to get your child rolling with confidence.
Why Cycling Matters for Kids
Cycling isn’t just a fun activity—it’s a foundational skill that builds coordination, strength, and independence. According to the American Academy of Pediatrics, regular physical activity like cycling helps children develop motor skills, maintain a healthy weight, and even improve mental well-being.
For parents, teaching a child to ride a bike is also an opportunity to instill safety awareness and responsibility. A well-chosen bike or accessory can make the learning process smoother, while the right gear ensures protection every step of the way.
If you're looking for more ways to keep kids active, check out engaging outdoor activities that pair well with cycling adventures.
How to Choose the Right Bike for Your Child
Selecting the best bike for kids starts with fit, function, and safety. Here’s what to consider before making a purchase:
1. Size and Fit
- Height over age: Always prioritize your child’s inseam measurement over their age. A bike that’s too large is dangerous, while one that’s too small can be uncomfortable.
- Stand-over test: Your child should be able to stand flat-footed over the bike with 1–2 inches of clearance between their crotch and the top tube.
- Reach: Handles should be easy to grip without overstretching, and brakes should be within comfortable reach.
2. Type of Bike
| Type | Best For | Key Benefits | Considerations |
|---|---|---|---|
| Balance Bike | Ages 18 months–5 years | Teaches balance naturally, no pedals | No training wheels needed |
| Tricycle | Toddlers (1–3 years) | Stable, low to the ground | Limited to flat surfaces |
| Pedal Bike (with training wheels) | Ages 3–6 | Builds pedaling confidence | Training wheels can be removed later |
| Pedal Bike (no training wheels) | Ages 5+ | Develops full cycling skills | Requires balance mastery |
| Indoor Exercise Bike | Ages 4–8 | Safe, weather-proof activity | Not for outdoor use |
| Bike Trailer | Toddlers–young kids | Family rides, no pedaling required | Requires adult cyclist |
3. Safety Features
- Helmet: Non-negotiable. Look for CPSC or ASTM certification and a snug, level fit.
- Brakes: Coaster brakes (foot-operated) are easier for beginners, while hand brakes offer better control as skills improve.
- Chain Guard: Protects little hands and clothing from the chain.
- Reflectors & Lights: Essential for visibility, especially in low-light conditions.
- Tires: Pneumatic (air-filled) tires provide better traction and a smoother ride than solid rubber.
4. Durability and Adjustability
- Frame material: Steel is sturdy but heavier; aluminum is lightweight and rust-resistant.
- Adjustable seat/handlebars: Extends the bike’s usability as your child grows.
- Weight: A lighter bike (under 40% of your child’s weight) is easier to control.
For more on selecting safe, age-appropriate gear, explore toy safety guides that apply similar principles to cycling equipment.
Top 5 Kids’ Cycling Picks for 2026
1. WEIZE Girls Bike – Best for First-Time Riders (Ages 3–12)
 Charming design with a sturdy steel frame and child-friendly features
The WEIZE Girls Bike is a standout choice for young cyclists taking their first pedaling steps. Designed with lightweight control and safety-first features, it’s ideal for kids transitioning from a balance bike or tricycle.
Why It’s Great for Kids
✅ Perfect sizing: Available in 14" (3–5 years) and 16" (4–7 years) with clear inseam guidance (18–22" for 14", 20–24" for 16"). ✅ Kid-specific design: Smaller grips, a high-carbon steel frame, and an easy-grip handbrake tailored for little hands. ✅ Full-coverage chain guard: Protects fingers, feet, and clothing from the chain. ✅ Anti-slip tires: Provide stability on pavement and light trails. ✅ Adorable wicker basket: Encourages kids to personalize their rides (great for carrying toys or snacks).
Assembly & Durability
- 85% pre-assembled with detailed instructions (20-minute setup).
- Tool kit included for final adjustments.
- Weight capacity: Up to 150 lbs, ensuring long-term use.
Pros & Cons
| Pros | Cons |
|---|---|
| Lightweight for easy handling | Handbrake may be tricky for very young riders |
| Durable steel frame | Requires precise sizing (measure inseam carefully) |
| Cute, functional basket | Training wheels not included (but compatible) |
| Simple assembly | Limited color options |
Parent Feedback
Parents love how quickly kids adapt to this bike, thanks to its balanced weight distribution and responsive brakes. The basket is a huge hit, making rides feel like mini adventures. Some note that adding training wheels (sold separately) helps beginners gain confidence faster.
2. JOYSTAR Little Daisy 14" Bike – Best for Personalization (Ages 3–5)
 Vibrant, girl-friendly design with dual braking and adjustable features
The JOYSTAR Little Daisy is a visually stunning bike that doesn’t sacrifice safety for style. With its daisy-themed frame, DIY decals, and doll seat, it’s a favorite for kids who love to customize their ride.
Key Features
✅ Dual braking system: Front handbrake + rear coaster brake for maximum stopping power. ✅ Full safety package: Front/rear reflectors, wheel reflectors, and an enclosed chain guard. ✅ Adjustable components: Removable training wheels, adjustable seat (18–22"), and handlebar height to grow with your child. ✅ Single-speed drivetrain: Simple for beginners to master. ✅ Lifetime warranty: Covers the steel frame for long-term peace of mind.
Pros & Cons
| Pros | Cons |
|---|---|
| Eye-catching, fun design | Only available in 14" (limited to younger kids) |
| Dual brakes build confidence | Doll seat may not appeal to all children |
| Training wheels included | Design is gender-specific |
| Easy 20-minute assembly | Heavier than some competitors |
Why Parents Love It
The dual braking system is a game-changer for safety, giving kids two ways to stop as they learn. The adjustable seat and handlebars mean it can last 2–3 years, and the training wheels make it beginner-friendly. Some parents replace the doll seat with a standard one for a more neutral look.
3. Kids Exercise Bike – Best Indoor Cycling Option (Ages 4–8)
 Sturdy stationary bike for active play, rain or shine
Not all cycling happens outdoors. The Kids Exercise Bike is a brilliant solution for burning energy indoors, especially on rainy days or in small spaces. It’s a self-propelled stationary bike that helps kids develop fitness habits early while having fun.
Why It Stands Out
✅ Safe indoor design: No risk of falls or collisions—perfect for apartments or playrooms. ✅ LED monitor: Tracks exercise time and auto-shuts off after 10 minutes of inactivity (requires 2 AA batteries). ✅ Adjustable resistance: Tension knob lets you customize the pedaling difficulty. ✅ Comfortable fit: Adjustable seat height (15–21") and cushioned handles. ✅ Durable build: Powder-coated steel frame supports up to 150 lbs.
Pros & Cons
| Pros | Cons |
|---|---|
| Great for bad weather days | Not a traditional outdoor bike |
| Encourages fitness from a young age | Requires batteries for display |
| Low-impact, joint-friendly | May be too simple for older kids |
| Compact (19.5" L x 14" W x 27" H) | No wheels for movement |
Parent & Kid Reactions
Parents rave about how this bike keeps kids engaged for 20–30 minutes at a time, making it a lifesaver on snowy or rainy days. The adjustable tension means it can grow with your child’s strength, and the sturdy base prevents wobbling. Some kids even race siblings on their own indoor bikes!
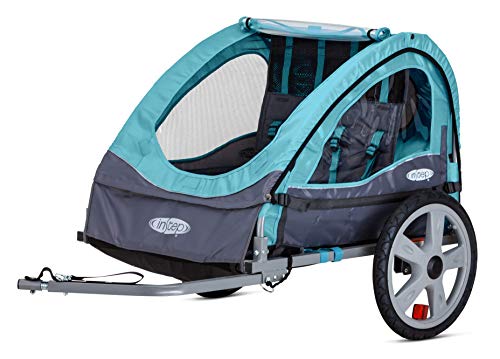
4. InStep Take 2 Bike Trailer – Best for Family Adventures (Ages 1–5)
 Double-seat trailer with weather protection for family rides
If your child isn’t ready to pedal but you love cycling together, the InStep Take 2 is the perfect solution. This double-seat trailer lets you bring two kids (up to 80 lbs total) along for the ride, making family outings easier and more fun.
Top Features
✅ Double-seat design: Fits two children comfortably with individual harnesses. ✅ All-weather protection: Two-in-one canopy with a bug screen and weather shield. ✅ Smooth ride: 16" pneumatic tires absorb bumps for a stable, comfortable experience. ✅ Easy storage: Folding frame and quick-release wheels for compact packing. ✅ Universal coupler: Fits most adult bikes with simple installation. ✅ Safety first: Five-point harnesses and a safety flag for visibility.
Pros & Cons
| Pros | Cons |
|---|---|
| Lets families cycle together | Requires a bike to pull it |
| Excellent protection from wind/rain | Adds length/weight to your bike |
| Comfortable for long rides | Not ideal for rough terrain |
| Easy to fold and store | Higher price point |
Real-World Use
Families love the ease of attachment and the smooth ride this trailer provides. The weather shield is a must-have for windy or buggy days, and the five-point harness keeps kids secure and snug. Some parents note that hills can be challenging to pull, so it’s best for flat or gently sloping paths.
5. VECKUSON Kickstand – Best Accessory for Bike Care (Ages 4+)
 Durable aluminum kickstand for easy bike parking
A kickstand might seem like a small detail, but it teaches responsibility and prevents damage to your child’s bike. The VECKUSON Kickstand is a must-have accessory for any kids’ bike, making it easy for them to park independently without tossing their bike on the ground.
Why It’s Essential
✅ Adjustable length: Wrench-adjustable (up to 4.5cm) for a custom fit. ✅ Wide compatibility: Fits 16"–20" bikes (including mountain, road, and BMX). ✅ Measurement guide: Frame height from ground should be 7.8–10.2" (20–26cm) for optimal stability. ✅ Durable material: Anti-rust aluminum alloy (waterproof, wear-resistant). ✅ Easy installation: Comes with 4mm and multifunctional wrenches.
Pros & Cons
| Pros | Cons |
|---|---|
| Prevents bike damage | Requires precise measurement |
| Encourages independence | Not universal (check compatibility) |
| Rust-resistant & sturdy | Must be installed separately |
| Lightweight (won’t weigh down the bike) | Incorrect length can cause instability |
Parent Insights
Parents say this kickstand lasts for years and prevents scratches from bikes being dropped. The adjustable feature is a huge plus, allowing it to fit multiple bikes as kids grow. Some recommend supervising the first few uses to ensure the bike is balanced correctly.
Essential Safety Gear for Kids’ Cycling
No bike is complete without the right safety gear. Here’s what every young cyclist needs:
1. Helmet (Non-Negotiable)
- Must meet CPSC or ASTM standards (look for a sticker inside).
- Fit check: Should sit level on the head, 1–2 finger widths above eyebrows, with straps snug under the chin (no more than one finger should fit between strap and chin).
- Replace after any crash—even if it looks fine, the foam may be compromised.
2. Knee & Elbow Pads
- Recommended for beginners to prevent scrapes and bruises.
- Look for adjustable straps and breathable fabric for comfort.
3. Gloves
- Improves grip and protects hands in case of a fall.
- Fingerless gloves are best for warm weather.
4. Bright Clothing & Reflectors
- Fluorescent colors (neon yellow, orange) improve visibility.
- Reflective strips on shoes, helmets, or backpacks are a must for low-light rides.
5. Closed-Toe Shoes
- Avoid sandals or flip-flops—they can slip off pedals or get caught in the chain.
- Sneakers with good grip are ideal.
For more on outdoor safety, check out top activities for kids that combine fun with preparedness.
Teaching Your Child to Ride: A Step-by-Step Guide
Learning to ride a bike is a milestone moment. Here’s how to make it smooth and stress-free:
Step 1: Start with a Balance Bike (Optional but Recommended)
- No pedals = no fear of falling while pedaling.
- Focus on gliding and steering first.
- Transition to a pedal bike is often effortless after mastering balance.
Step 2: Choose the Right Location
- Flat, open space (empty parking lot, quiet street, or grassy field).
- Avoid traffic, hills, or rough terrain at first.
- Grass is softer for falls but harder to pedal on—pavement is better once they’re confident.
Step 3: Lower the Seat
- Your child should be able to flat-foot the ground while sitting.
- This builds confidence and eases fear of falling.
Step 4: Practice Scooting & Gliding
- Have them push off with their feet and lift legs to glide.
- Encourage looking ahead (not at their feet).
Step 5: Introduce Pedaling
- If using training wheels, let them get used to pedaling first.
- If no training wheels, hold the seat lightly (don’t over-support—they need to feel balance).
- Run alongside (not holding the handlebars) to help them stay upright.
Step 6: Let Go (When They’re Ready!)
- Signs they’re ready:
- Can glide with feet up for 5+ seconds.
- Steers confidently without wobbling.
- Asks you to let go (a big clue!).
- First solo ride: Stay close but let them feel the balance.
Step 7: Celebrate & Practice
- Praise effort, not just success—falling is part of learning!
- Short, frequent sessions (10–15 minutes) work better than long, frustrating ones.
- Gradually increase distance as they improve.
Pro Tip: If your child is struggling with fear, try walking with the bike first, then scooting, then pedaling. Break it into small, manageable steps.
Common Mistakes to Avoid
Even with the best intentions, parents sometimes unintentionally make learning harder. Here’s what to watch out for:
❌ Buying a bike that’s too big – A child should never have to tiptoe to reach the ground. ❌ Skipping the helmet – No exceptions, even for "just a quick ride." ❌ Holding the handlebars – This prevents them from learning balance. Hold the seat or frame instead. ❌ Overcorrecting their steering – Let them wobble a little—it’s how they learn! ❌ Starting on a hill – Flat ground only until they’re fully confident. ❌ Using training wheels too long – If they’re not wobbling at all, it’s time to remove them. ❌ Ignoring bike maintenance – Check tire pressure, brakes, and chain regularly for safety.
FAQs About Kids’ Cycling
Q: How do I know if my child is ready for a pedal bike?
A: If they can balance on a balance bike for 10+ seconds or glide with feet up on a pedal bike (with training wheels removed), they’re likely ready. Confidence and coordination matter more than age.
Q: Should I get a bike with training wheels or a balance bike first?
A: Balance bikes are the modern recommendation—they teach natural balance without the crutch of training wheels. Kids who start on balance bikes often skip training wheels entirely and transition faster to pedal bikes.
Q: What’s the best way to measure my child for a bike?
A: Inseam measurement is most important. Have your child stand against a wall with legs straight, then measure from the floor to their crotch. Compare this to the bike’s stand-over height (the distance from the ground to the top tube). 1–2 inches of clearance is ideal.
Q: How often should I check my child’s bike for safety?
A: Before every ride, do a quick check:
- Tires: Properly inflated (not too hard or flat).
- Brakes: Squeeze levers to ensure they stop the bike smoothly.
- Chain: Not loose or rusty.
- Seat & handlebars: Tight and secure.
- Wheels: Spin freely, no wobbles.
Q: Are bike trailers safe for infants?
A: Most bike trailers (like the InStep Take 2) are safe for children 1+ years old who can sit upright unassisted and wear a helmet. Always follow the manufacturer’s age/weight limits and never leave a child unattended in a trailer.
Q: How can I make cycling more fun for my child?
A:
- Turn it into a game: Time their laps, set up a mini obstacle course, or have a "bike parade."
- Ride with friends: Kids are more motivated when peers are involved.
- Let them personalize their bike: Add stickers, a bell, or a basket to make it theirs.
- Explore new trails: Find scenic paths or bike-friendly parks to keep rides exciting.
- Reward progress: Celebrate milestones (first ride without training wheels, longest distance, etc.).
Q: What’s the best way to store kids’ bikes?
A:
- Indoors (garage, shed, or even inside) to prevent rust and weather damage.
- Hang bikes on hooks to save space and avoid flat tires from sitting on the ground.
- Use a bike rack if storing multiple bikes.
- Cover with a tarp if storing outside temporarily.
Beyond Bikes: More Ways to Keep Kids Active
Cycling is just one way to keep kids moving. For more engaging physical activities, check out:
- Top outdoor adventures for kids – From hiking to scavenger hunts.
- Indoor play ideas – For days when the weather doesn’t cooperate.
- Sensory-friendly toys – For kids who need extra support in play.
Conclusion
Finding the best bike for kids—or the right cycling accessory—comes down to safety, fit, and fun. Whether you opt for a first pedal bike like the WEIZE or JOYSTAR, an indoor exercise bike for rainy days, a family-friendly trailer, or a practical kickstand, each pick in this guide is designed to enhance your child’s cycling experience.
Start with the right size, prioritize safety gear, and make learning enjoyable—not stressful. Before you know it, your little one will be zooming ahead with confidence, ready for a lifetime of two-wheeled adventures.
Next step: Measure your child’s inseam, pick a bike or accessory from this list, and get ready to roll! 🚴♂️💨 Happy riding!