
Who says skeletons only come out during Halloween? If you’re looking for a creative and spooky way to decorate your house all year round, then you must try the Skeletons Climbing House Tutorial! This DIY project is perfect for those who love to be a little bit extra when it comes to decorating their homes. Imagine the looks of awe and admiration your neighbors will give you once they see your unique house decor idea. But wait, you might be thinking, where do I even start with this project? Fear not, for we have got you covered.
This tutorial will guide you through step-by-step instructions on how to create the perfect skeleton climbing scene on the side of your house. You’ll learn everything from the materials you need to the best way to secure the skeletons to your house. So, get ready to impress your friends and family with this one-of-a-kind house decoration.
And who knows, it might even become a neighborhood tourist attraction!
Materials Needed
To make a spooky scene of skeletons climbing your house for Halloween, you’ll need a few basic materials. First, you’ll need some PVC pipes and connectors to create the framework for the skeletons. You’ll also need a skeleton prop that you can position on the PVC frame.
For added effect, you can use fake spider webs to wrap around the skeleton and PVC frame to give it a weathered and creepy look. Additionally, you’ll need some zip ties or string to securely fasten the skeleton and webs to the PVC frame. Lastly, a ladder and someone to help you will make it easier to climb up and attach the framework to the various parts of your house.
Once you have all the materials, you can customize your skeleton climb by deciding where to place the pieces and how scary you want it to appear. Overall, this DIY project can make for a spine-tingling and memorable Halloween decoration.
Skeleton decorations
If you are looking to create spooky and fun skeleton decorations for Halloween, there are a few materials you’ll need to get started. First, you’ll need some skeleton bones. You can purchase plastic or foam skeleton bones at most Halloween supply stores, or you can make your own out of materials like paper mache or wire.
Some additional materials you’ll need include black paint, glue, and string or fishing line to hang your decorations. If you want to add some extra pizzazz to your skeleton decorations, consider adding items like glitter, sequins, or fabric to give your skeletons a unique look. With a little bit of creativity and these essential materials, you’ll be on your way to creating some spine-tingling skeleton decorations in no time! So, are you ready to get started on your Halloween DIY project?
Hooks or adhesive strips
One of the most important things to consider when using adhesive hooks or strips is the materials you need for proper installation. When choosing your hooks or strips, make sure they are strong enough to hold the weight of the item you wish to hang. Additionally, ensure you have a clean and dry surface to apply your hooks or strips to for maximum adhesion.
You may need rubbing alcohol or a cleaning solution to prepare the surface prior to application. It is also important to follow the instructions provided by the manufacturer to ensure proper installation and longevity of your hooks or strips. Remember, using the right materials and following instructions will result in a more secure and long-lasting hold.
Ladder or step stool
When it comes to reaching high spaces, having a ladder or step stool is essential. However, before you go ahead and purchase one, it is important to consider the materials used. For ladders, you can choose from aluminum, steel, or fiberglass.
Aluminum ladders are lightweight, making them easy to transport, but they may not be as durable as their steel or fiberglass counterparts. Steel ladders are incredibly strong and stable, but they are heavy and may not be the best option for moving around frequently. Fiberglass ladders are durable, weather-resistant, and safe to use around electricity, but they can be more expensive than other types of ladders.
Step stools, on the other hand, are typically made from wood or plastic. Wooden step stools are sturdy and stylish, but they may be heavier than plastic stools, which can make them more difficult to move around. Plastic step stools are lightweight and affordable, making them a great option for those who need something easy to store and move.
In conclusion, be sure to consider the materials used when purchasing a ladder or step stool. Take into account your needs, such as how often you’ll be using it and where you’ll be using it. With the right choice of materials, you’ll have a safe and reliable tool for all your high-reaching needs.
Choosing the Right Wall
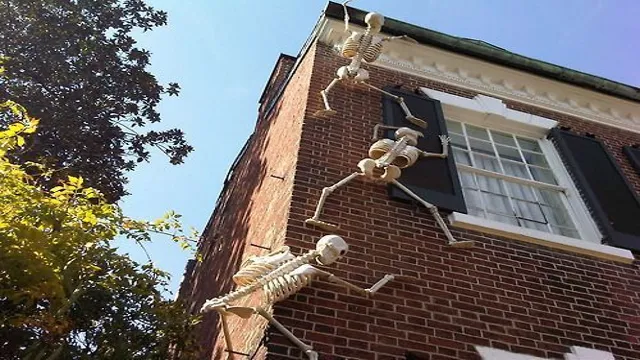
If you’re looking to create a spooky display for Halloween, why not try making skeletons appear as if they’re climbing your house? To achieve this effect, choosing the right wall is key. Look for a surface that’s visible from the street or sidewalk, and consider using an exterior wall with some texture, such as brick or stucco, so that the skeletons will appear to grip onto the surface. It’s also important to make sure the wall is sturdy enough to support the weight of your decorations, so assess its condition before getting started.
Once you’ve found the perfect spot, you can begin positioning your skeletons. Try to arrange them in a lifelike manner, with some hanging off the edge of the roof and others climbing up the walls. You can add other spooky decorations, like cobwebs or bats, to complete the look.
With a little creativity and some careful planning, you can easily make your house the talk of the neighborhood this Halloween.
Determining weight limits
When deciding on weight limits for your wall, it’s important to choose the right type of wall to fit your needs. The weight limit of a wall can vary greatly depending on the material it’s made of, the thickness of the wall, and the size of the wall. A concrete wall, for example, can hold significantly more weight than a wooden wall of the same size.
But even within the same material, weight limits can vary. It’s important to consult with a professional or consult manufacturer specifications to ensure you choose the right type of wall for your specific needs. Don’t risk overloading your wall and causing damage or potential safety hazards.
By choosing the right wall and properly determining weight limits, you can ensure a strong and secure structure.
Considering visibility from street
When considering visibility from the street, one of the most important factors to consider is choosing the right wall. You want a wall that can make a statement and attract attention, while also being visible from a distance. If your business is located in a busy area with a lot of foot traffic, you want a wall that is striking enough to stop people in their tracks.
This could be a brightly colored wall or one with a unique design that makes it stand out. Alternatively, if your business is located in a quiet area, you may want to go for a more subtle approach, such as using a textured wall or a wall with interesting lighting. Whatever you choose, make sure it reflects your brand and creates a lasting impression in the minds of passersby.
By choosing the right wall, you can make the most of your visibility from the street and attract more customers to your business.
Arranging Skeletons
If you want to create an eye-catching Halloween decoration, consider making skeletons climbing your house! It might seem daunting at first, but it’s actually quite simple. First, you’ll need a few life-size skeletons, which you can purchase at most party supply stores or online. Once you have your skeletons, you’ll need to arrange them in a climbing position.
You can use clear fishing line or wire to attach the skeletons to your house, being careful not to damage the siding. Start at the bottom and work your way up, positioning the skeletons as if they are scaling the walls. For added effect, you can even add props, like ropes or climbing gear, to make it look more realistic.
Voila! You now have a spine-tingling Halloween decoration that’s sure to impress your neighbors!
Start at the top
When it comes to arranging skeletons, starting at the top is the best way to go. This means beginning with the skull, the most complex and detailed part of the skeleton. By starting here, you can ensure that you have the right orientation and placement for the rest of the bones.
It also helps provide a framework for the rest of the skeleton to attach to. From there, you can work your way down, carefully arranging each bone to create a complete and accurate representation of the body. It may seem overwhelming at first, but with patience and attention to detail, arranging a skeleton can be both fascinating and rewarding.
So, why not start at the top and see where your curiosity takes you?
Alternate arm and leg placement
When it comes to arranging skeletons, there are a variety of techniques to create dynamic and interesting displays. One popular method is to alternate the placement of the arms and legs. This creates a unique visual appeal that draws the eye and adds depth to a display.
By positioning the limbs in different orientations, such as crossing the legs or resting one hand on the hip, the skeleton takes on a more natural and lifelike appearance. Additionally, this technique can be used to create different moods or themes. For example, arranging the limbs in a dancing pose can evoke a sense of celebration, while placing them in a more somber posture can create a mood of contemplation.
Overall, alternating the placement of the arms and legs is a simple yet effective way to add interest and realism to a skeleton display.
Overlap to create depth
When arranging skeletons in a 3D animation, it’s important to create overlap to give the scene depth and realism. This means making sure that the limbs and body parts of the characters in the foreground overlap with those in the background. By doing this, the viewer’s brain processes the scene as having more dimension and the characters appear as if they are truly existing in a 3D space.
Adding this kind of depth can also make the animation more visually interesting, keeping the viewer engaged and immersing them in the world you’ve created. So when it comes to arranging skeletons for your animation, don’t forget to focus on overlap. This simple technique can make a huge difference in the quality and realism of your final product.
Securing the Skeletons
If you’re looking to create a spooky Halloween decoration that will delight trick-or-treaters and passersby, consider creating a skeleton climbing up the side of your house. This can be a fun and relatively simple project, but it’s important to make sure that your decoration is safe and secure. One way to do this is by using suction cups and fishing line to attach the skeleton to your house.
This will allow you to create the illusion of the skeleton climbing without actually damaging your home’s exterior. Make sure to test the suction cups and fishing line before proceeding with the installation, and be careful not to put too much weight on any one suction cup. You can also use zip ties or other durable fasteners to attach the skeleton to a sturdy frame or pole, ensuring that it won’t fall or blow away.
With a little bit of creativity and some careful planning, you can create a spooky and exciting Halloween decoration that will impress your friends and family.
Using hooks or adhesive strips
Securing Halloween decorations can be tricky, but using hooks or adhesive strips can make it a lot easier, especially when it comes to those spooky skeletons. Hooks can be a great option when you have a place to hang them from, like a tree or porch overhang. Adhesive strips are perfect for attaching the skeletons to flat surfaces like walls or doors.
When using adhesive strips, it’s important to make sure the surface is clean and dry before applying them, and to not hang anything too heavy. The last thing you want is your skeleton falling down mid-Halloween party! Overall, whether you opt for hooks or adhesive strips, they can be a reliable and easy way to secure your skeletons and add some spooky fun to your Halloween décor.
Testing for stability
When building a structure, ensuring its stability is critical. This is especially true for skeletal structures, which support a building’s weight. Testing for stability is, therefore, a crucial step in the design and construction process.
One way to do this is by securing the skeletons. This involves installing steel brackets and braces to reinforce weak points in the structure. For instance, attaching diagonal braces on the trusses in a roof will help distribute the weight evenly across the roof’s surface, preventing it from collapsing.
Additionally, welding corner brackets to the beams and columns can increase their load-bearing capacity and minimize lateral movement. Overall, securing the skeletons helps distribute the forces evenly within the structure, minimizing the risk of failure.
Bonus Tips
So, you want to make a spooky and exciting scene on your house with skeletons climbing the walls? Well, here are some bonus tips to help you achieve that eerie effect you’re looking for. First, make sure to use realistic-looking skeletons. Avoid cheap, plastic ones that may look more comical than scary.
Second, use wire or fishing line to attach the skeletons to your walls, making sure they’re secure enough to hold their weight. Third, add some spooky lighting to your display. A single, dimly lit spotlight on the climbing skeletons can create an extra sense of foreboding for those passing by.
Fourth, don’t forget to add some sound effects, like eerie music or recorded screams, to complete the creepy atmosphere. Finally, make it interactive – use sensors and animated props that will trigger and move when people walk by, making your display even more engaging. By following these bonus tips, you’ll be sure to have the spookiest house on the block.
Happy haunting!
Adding lights for extra spooky effect
Adding lights can take your Halloween decorations to the next level and create the perfect spooky atmosphere. There are several ways to incorporate lights into your decorations, such as using string lights to illuminate trees and bushes in your front yard or lining the walkway with glow sticks. Another great idea is to use black lights to create a haunting glow effect.
Simply swap out your regular light bulbs with black light bulbs and watch as the white portions of your decorations transform into an eerie shade of purple. You can also project spooky images onto your house using a Halloween themed projector. These added touches will surely make your home stand out and create a truly haunting vibe.
Don’t forget to take some pictures and share them on social media using the hashtag #spookydecorations!
Creating a climbing scene with other decorations
One way to spice up a climbing scene is by adding other decorations to create a more immersive experience. Some bonus tips to consider include adding foliage such as plants and fake rocks, which can enhance the natural look of the wall and create the feeling of being outdoors. Another way to add depth and excitement to the wall is by introducing different textures and surfaces, such as overhangs, ledges, and cracks for climbers to navigate.
The climbing scene can also be enhanced by adding lighting effects, which can highlight specific routes or create a unique ambiance. Finally, incorporating a 3D mural or art installation can create a visually appealing backdrop, adding to the overall experience of the climbing wall. With these bonus tips, you can take your climbing wall from simple to spectacular, creating a dynamic and unforgettable experience for climbers of all levels.
Conclusion
There’s no need to get spooked about creating a skeleton climbing up your house! With a little creativity, some basic materials like PVC pipes, wire, and foam, you can quickly transform your home into a hauntingly fun scene. Just remember to keep safety in mind, and don’t forget to add some creepy touches like missing bones or glowing eyes to really bring your skeleton to life. So go ahead and give your neighbors a bone-chilling surprise by making your own spooky skeleton climber today!”
FAQs
What materials do I need to make a skeleton climbing house decoration?
To make a skeleton climbing house decoration, you will need a plastic skeleton, wire or fishing line, hot glue gun, and a small-scale dollhouse or birdhouse.
Can I use a real human skeleton for my climbing house decoration?
No, it’s not recommended to use real human bones for any type of decoration, as it’s illegal and disrespectful. It’s best to use plastic or foam skeletons that can be easily found at Halloween stores.
How can I make the skeleton look like he’s actually climbing the house?
To make the skeleton look like he’s climbing the house, attach small pieces of wire or fishing line to his hands and feet, and then attach the other end to the roof or other parts of the house. Make sure to position the limbs accordingly to give the illusion of climbing.
Can I customize my skeleton climbing house decoration?
Yes, you can customize your decoration by adding miniature props or accessories to the house, such as bats, spiders, and spider webs. You can also paint the skeleton to give it a more realistic look.